# Installation and updates
Installing XTDir for SobiPro (opens new window) is no different than installing any other Joomla!™ extension on your site. You can read the complete instructions for installing Joomla!™ extensions on the official help page (opens new window). Throughout this chapter, we assume that you are familiar with these instructions and we will try not to duplicate them.
# Installing or manually updating the component
Just like with most Joomla! extensions there are three ways to install or manually update XTDir on your site:
- Install from URL It is the easiest and fastest one, if your server supports it. Most servers do support this method.
- Upload and Install. That's the typical extension installation method for Joomla! extensions. It rarely fails.
- Manual installation. This is the hardest, but virtually fail-safe, installation method.
Please note that installing and updating XTDir (and almost all Joomla! extensions) is actually the same thing. If you want to update XTDir please remember that you MUST NOT uninstall it before installing the new version! When you uninstall XTDir you will lose all your settings. This is definitely something you do not want to happen! Instead, simply install the new version on top of the old one. Joomla! will figure out that you are doing an update and will treat it as such, automatically.
TIP
If you find that after installing or updating XTDir it is missing some features or doesn't work, please try installing the same version a second time, without uninstalling the component. The reason is that very few times the Joomla! extensions installer infrastructure gets confused and fails to copy some files or entire folders. By repeating the installation you force it to copy the missing files and folders, solving the problem.
# Install from URL
The easiest way to install XTDir is using the Install from URL feature in Joomla!.
TIP
This Joomla! feature requires that your server supports fopen() URL wrappers (allow_url_fopen is set to 1 in your server's php.ini file) or has the PHP cURL extension enabled. Moreover, if your server has a firewall, it has to allow TCP connections over ports 80 and 443 to www.extly.com and cdn.extly.com. If you don't see any updates or if they fail to download please ask your host to check that these conditions are met. If they are met but you still do not see the updates please file a bug report in the official Joomla! forum (opens new window). In the meantime, you can use the manual update methods discussed further below this page.
First, go to our site's download page (opens new window) for XTDir. Make sure you are logged in. If not, login now. These instructions won't work if you are not logged in! Click on the version you want to install. Please note that the latest released version is always listed first on the page. On that page, you will find XTDir. Next to the Download Now button you will see the DirectLink link. Right click on it and select Copy link address or whatever your browser calls this.
Now go to your site's administrator page and click on Extensions, Extension Manager. If you have Joomla! 3.x click on the Install from URL tab. Clear the contents of the Install URL field and paste the URL you copied from our site's download page. Then click on the Install button. Joomla! will download and install the XTDir update.
# Upload and Install
- You can download the latest installation packages from our site's download page (opens new window) for XTDir. Please note that the latest version is always on top. Click on the version you want to download and install.
- Click on the XTDir item to download the ZIP installation package.
- All XTDir installation packages contain the component and all of its associated extensions. Installing it will install all of these items automatically. It can also be used to upgrade XTDir; just install it without uninstalling the previous release.
- Log in to your site's administrator section. Click on Extensions, Manage link on the top menu. If you are on Joomla! 3.x please click on the Upload Package File tab. Locate the Browse button next to the Package File or Extension package file field. Locate the installation ZIP file you had previously downloaded and selected it. Back to the page, click on the Upload & Install button. After a short while, Joomla!™ will tell you that the component has been installed.
# Manual installation
- You can download the latest installation packages our site's download page (opens new window) for XTDir. Please note that the latest version is always on top. Click on the version you want to download and install.
- Click on the XTDir item to download the ZIP installation package.
- All XTDir installation packages contain the component and all of its associated extensions. Installing it will install all of these items automatically. It can also be used to upgrade XTDir; just install it without uninstalling the previous release.
- Before doing anything else, you have to extract the installation ZIP file in a subdirectory named XTDir on your local PC. Then, upload the entire subdirectory inside your site's temporary directory. At this point, there should be a subdirectory named XTDir inside your site's temporary directory which contains all of the ZIP package's files.
- If you are unsure where your site's temporary directory is located, you can look it up by going to the Global Configuration, click on the Server tab and take a look at the Path to Temp-folder setting. The default setting is the tmp directory under your site's root. Rarely, especially on automated installations using Fantastico, this might have been assigned the system-wide /tmp directory. In this case, please consult your host for instructions on how to upload files inside this directory, or about changing your Joomla!™ temporary directory back to the default location and making it writable.
- Assuming that you are past this uploading step, click on Extensions, Manage link on the top menu. If you are on Joomla! 3.x please click on the Install from Directory tab. Locate the Install Directory edit box. It is already filled in with the absolute path to your temporary directory, for example /var/www/joomla/tmp. Please append /xtdir to it. In our example, it should look something like /var/www/joomla/tmp/xtdir. Then, click on the Install button.
TIP
If you still can't install XTDir and you are receiving messages regarding unwritable directories, inability to move files, or other similar file system related error messages, please consult our installation troubleshooting instructions. If these instructions do not help please do not request support from us; we are unlikely to be able to help you. These errors come from your site set up and can best be resolved by asking your host for assistance or by asking other users in the official Joomla!™ forums.
# Upgrading from a XTDir module to full XTDir solution
Upgrading from any XTDir module to the full XTDir for SobiPro is by no means different than installing the component. You do not have to uninstall the previous version; in fact, you MUST NOT do that. Simply follow the installation instructions to install XTDir over the existing XTDir partial installation. That's all! All your settings are preserved.
TIP
When upgrading from XTDir to XTDir you usually have to install the package twice, without uninstalling anything in between. Sometimes Joomla! does not copy some of the files and folders the first time you install it. However, if you install the package again (without uninstalling your existing copy of XTDir) Joomla! copies all of the necessary files and performs the upgrade correctly.
# Updates
Our extensions can be upgraded just installing the new version on top of the previous version.
We recommend to test the update in a development site, check the new features and test before the deployment to the live site. If you are upgrading from an old version (after skipping several versions), we "strongly" suggest to test the new version before the upgrade.
TIP
Remember to create a backup before any major change. Protect your data with backup and restore processes. Akeeba's Backup (opens new window) is a handy tool that can easily simplify your site backup/restore tasks.
This is our recommended procedure to install an update:
- Identify XTDir installed extensions (e.g., XTDir for SobiPro and XTDir for JomSocial)
- Identify XTDir-SobiPro Apps:
- Download XTDir latest versions
- Update to the latest versions, in the same order than they were previously installed
- Update each XTDir-SobiPro App from the associated configuration area. Please, check this slide, Tutorial: XTDir for SobiPro - Updates (opens new window)
# Checking for the latest version and upgrading
You can check for the latest published version by visiting site's download page (opens new window) for XTDir. The page lists the version and release date of the latest XTDir release. You can also check it against the data which appear on the right-hand pane of your XTDir Control Panel. If your release is out of date, simply click on the Download link to download the install package of the latest release to your PC.
TIP
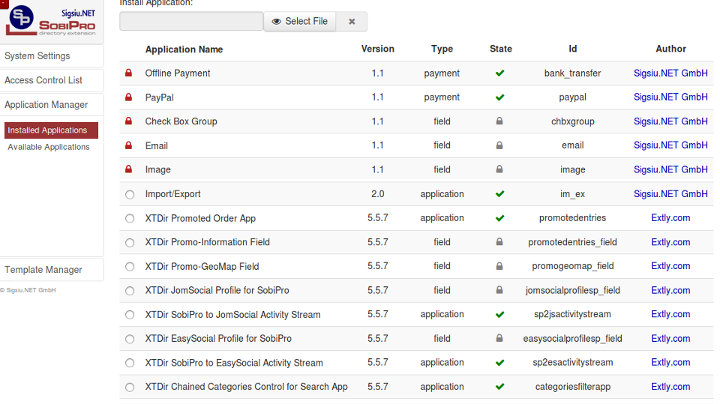
XTDir solution has a component, modules, plugins, SobiPro Apps, and SobiPro fields. XTDir component, modules, and plugins are updated by Joomla! Extensions installer. But, XTDir-SobiPro Apps and XTDir-SobiPro fields, which are manually installed from XTDir, must be manually updated from XTDir following the same procedure. After a XTDir update, please, remember to also update XTDir-SobiPro optional Apps and XTDir-SobiPro optional fields to the same version, in SobiPro App Manager. Visit each associated XTDir configuration area and click the Update button for the app or field.
Tutorial: XTDir for SobiPro - Updates (opens new window)
# Updating automatically with the Joomla! extensions update feature
TIP
This Joomla! feature requires that your server supports fopen() URL wrappers (allow_url_fopen is set to 1 in your server's php.ini file) or has the PHP cURL extension enabled. Moreover, if your server has a firewall, it has to allow TCP connections over ports 80 and 443 to www.extly.com and cdn.extly.com. If you don't see any updates or if they fail to download please ask your host to check that these conditions are met. If they are met but you still do not see the updates please file a bug report in the official Joomla! forum (opens new window). In the meantime, you can use the manual update methods discussed further below this page.
XTDir can be updated just like any other Joomla! extension, using the Joomla! extensions update feature. Joomla! is responsible for finding the updates, downloading them and installing them on your server. You can access the extensions update feature in two different ways:
- From the icon your Joomla! administrator control panel page. On Joomla! 3 you will find the icon in the left-hand sidebar, under the Maintenance header. It has an icon like an empty star. On Joomla! 2.5 you will find it in the main area of the control panel page, under Quick Icons. When there are updates found for any of your extensions you will see the Updates are available message. Clicking on it will get you to the Update page of Joomla! Extensions Manager.
- From the top menu of your Joomla! administrator click on Extensions, Extensions Manager. From that page click on the Update tab found in the left-hand sidebar on Joomla! 3 and the top navigation bar in Joomla! 2.5. Clicking on it will get you to the Update page of Joomla! Extensions Manager.
If you do not see the updates try clicking on the Find Updates button in the toolbar. If you do not see the updates still you may want to wait up to 24 hours before retrying. This has to do with the way the update CDN works and how Joomla! caches the update information. Unfortunately we can't do anything about it, especially in Joomla! 3 (there is no way to forcibly clean the updates cache).
If there is an update available for XTDir tick the box to the left of its row and then click on the Update button in the toolbar. Joomla! will now download and install the update.
TIP
XTDir needs you to set up the Download ID (opens new window) before you can install the updates. You can find your main Download ID (opens new window), in your Account/Your Download ID (opens new window). Then go to your site's administrator page and click on Components, XTDir, and click on the Options button in the toolbar. Click on the Live Update tab and paste your Download ID there. Finally, click on Save & Close.
# Updating manually
As noted in the installation section, installing and updating XTDir is actually the same thing. If the automatic update using Joomla!'s extensions update feature does not work, please install the update manually following the instructions in the installation section of this documentation.
TIP
When installing an update manually you MUST NOT uninstall your existing version of XTDir. Uninstalling XTDir will always remove all your settings. You definitely not want that to happen!
# Uninstallation
You can uninstall the main component just like any other Joomla! component. In your site's back-end, just go to Extensions Manager, click on Uninstall, select XTDir and click on Uninstall. This will completely remove XTDir including all plugins and modules.
Finally, XTDir has a component, modules, plugins, SobiPro Apps and Fields. Joomla! Extenstons Manager can uninstall native extensions, but XTDir-SobiPro Apps and Fields have to be uninstalled from SobiPro Application Manager. To complete the uninstallation, visit SobiPro Application Manager, and remove all XTDir Apps and Fields.